Homemade Pickled Vegetable Jars
Homemade Pickled Vegetable Jars – Introduction
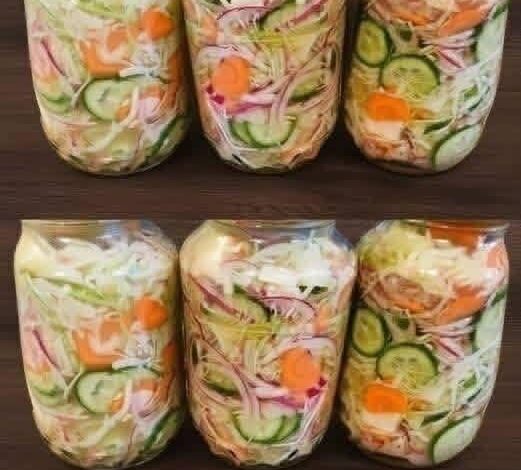
There’s something deeply satisfying about opening a jar of Homemade Pickled Vegetable Jars and hearing that gentle pop of freshness. These vibrant, tangy vegetables are more than just a condiment—they’re a celebration of flavor, texture, and tradition. Crisp cucumbers, sweet carrots, and zesty onions come together in a perfectly balanced brine that transforms simple produce into something truly special.
Making Homemade Pickled Vegetable Jars at home gives you full control over what goes into your food. You can adjust the salt, sugar, and spices exactly to your liking, creating a personalized blend that suits your taste. Unlike store-bought versions, your homemade jars are free from unnecessary preservatives while still delivering bold, mouthwatering flavor.
Whether you’re adding a crunchy topping to sandwiches or enjoying them straight from the jar, Homemade Pickled Vegetable Jars are a versatile staple that belongs in every kitchen. This guide will walk you through everything you need to know to create perfect pickles every time.
Homemade Pickled Vegetable Jars Why This Recipe Works
One of the reasons Homemade Pickled Vegetable Jars are so popular is because the method is simple yet incredibly effective. The combination of vinegar, water, salt, and spices creates the perfect environment for preserving vegetables while enhancing their flavor.
The balance of acidity and seasoning in Homemade Pickled Vegetable Jars ensures that every bite is crisp and tangy without being overpowering. The vinegar provides that signature sour kick, while the sugar (optional) softens the sharpness just enough to create harmony.
Another reason this recipe works so well is flexibility. You can easily swap vegetables depending on what you have available. From cucumbers to cabbage, Homemade Pickled Vegetable Jars adapt beautifully to seasonal produce.
Homemade Pickled Vegetable Jars – What You’ll Need For This Recipe
To create perfect Homemade Pickled Vegetable Jars, you’ll need fresh ingredients and a few pantry staples:
- 4 cups mixed vegetables (cucumbers, carrots, red onion, cabbage)
- 2 cups white vinegar (5% acidity)
- 2 cups water
- 2 tablespoons pickling salt
- 2 tablespoons sugar (optional)
- 4 cloves garlic, sliced
- 2 teaspoons mustard seeds
- 1 teaspoon dill seeds
- 1/2 teaspoon black peppercorns
- 1/4 teaspoon red pepper flakes (optional)
- Fresh dill sprigs (optional)
- Clean pint-sized jars with lids
The beauty of Homemade Pickled Vegetable Jars lies in their simplicity. Each ingredient plays a role in building flavor and preserving the vegetables.
Homemade Pickled Vegetable Jars – How To Make This Recipe
Making Homemade Pickled Vegetable Jars is easier than you might think. Follow these steps:
Step 1: Prepare the Vegetables
Wash and slice all vegetables evenly. Uniform cuts ensure even pickling.
Step 2: Pack the Jars
Divide garlic, spices, and dill into each jar. Pack vegetables tightly but leave a little space at the top.
Step 3: Make the Brine
In a saucepan, combine vinegar, water, salt, and sugar. Heat until dissolved.
Step 4: Pour the Brine
Carefully pour hot brine over the vegetables, fully covering them.
Step 5: Seal and Cool
Close jars tightly and let them cool at room temperature.
Step 6: Refrigerate
Place your Homemade Pickled Vegetable Jars in the fridge for at least 24 hours before enjoying.
Homemade Pickled Vegetable Jars – Tips + Tricks & More For Recipe Success
To make the best Homemade Pickled Vegetable Jars, keep these tips in mind:
- Use the freshest vegetables for maximum crunch
- Always use non-iodized salt
- Let jars sit longer for deeper flavor
- Experiment with spices like coriander or bay leaves
- Keep vegetables fully submerged in brine
These small adjustments can take your Homemade Pickled Vegetable Jars from good to exceptional.
Homemade Pickled Vegetable Jars – How to Serve
Serving Homemade Pickled Vegetable Jars is where the fun begins. They can be enjoyed in countless ways:
- As a tangy snack straight from the jar
- As a side dish with grilled meats
- Chopped into salads or wraps
The bright acidity of Homemade Pickled Vegetable Jars helps balance rich and savory dishes.
Homemade Pickled Vegetable Jars – Serving Suggestions
Here are some creative ways to use Homemade Pickled Vegetable Jars:
- Add to sandwiches and burgers
- Serve with cheese boards
- Pair with roasted meats or fish
- Mix into grain bowls
- Use as a topping for tacos
No matter how you serve them, Homemade Pickled Vegetable Jars bring a burst of flavor to every meal.
Homemade Pickled Vegetable Jars – Time
Understanding the timing helps ensure your Homemade Pickled Vegetable Jars turn out perfectly:
- Prep Time: 15 minutes
- Cook Time: 5 minutes
- Cooling Time: 1 hour
- Minimum Pickling Time: 24 hours
- Total Time: About 1 day
Homemade Pickled Vegetable Jars – Final Thoughts
Once you try making Homemade Pickled Vegetable Jars, it’s hard to go back to store-bought versions. The flavor, freshness, and customization make all the difference.
These Homemade Pickled Vegetable Jars are not just a recipe—they’re a kitchen essential. They bring color, crunch, and character to any dish, making everyday meals more exciting.
Homemade Pickled Vegetable Jars – A Flavorful Tradition
Pickling has stood the test of time, and Homemade Pickled Vegetable Jars are proof of its lasting appeal. This simple method transforms humble ingredients into something extraordinary.
Homemade Pickled Vegetable Jars – Perfect for Every Season
No matter the season, Homemade Pickled Vegetable Jars allow you to preserve fresh produce and enjoy it longer.
Homemade Pickled Vegetable Jars – A Kitchen Must-Have
Every home cook should have a batch of Homemade Pickled Vegetable Jars ready to go. They’re convenient, delicious, and endlessly versatile.
Homemade Pickled Vegetable Jars – Easy and Delicious
With minimal effort, you can create Homemade Pickled Vegetable Jars that taste incredible and elevate your meals.