Easy Homemade Ice Cream – Rich and Creamy No-Churn Truffle Ice Cream
Introduction
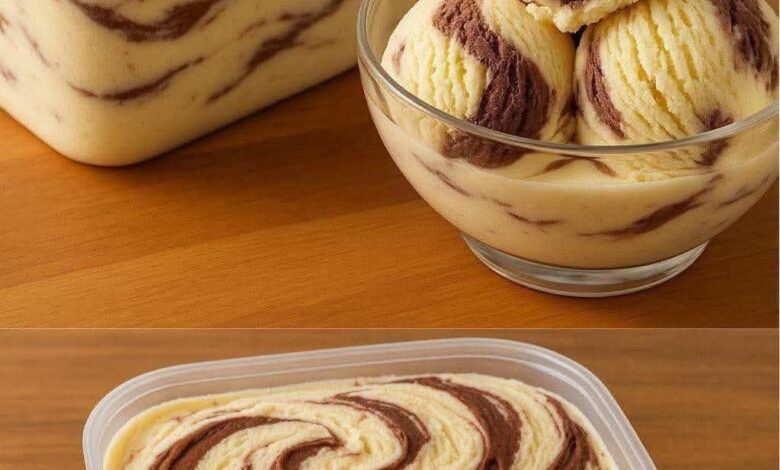
There is something incredibly satisfying about creating a frozen dessert from scratch, especially when the result is as luxurious as this Easy Homemade Ice Cream. Rich, creamy, and filled with beautiful ribbons of chocolate truffle ganache, this dessert proves that you do not need an expensive ice cream machine to achieve professional-quality results at home.
This Easy Homemade Ice Cream recipe combines simple pantry ingredients with a foolproof no-churn method, making it accessible to both beginners and experienced home cooks. The combination of sweetened condensed milk, heavy cream, powdered milk, and vanilla creates an ultra-smooth texture that freezes beautifully while remaining scoopable and indulgent.
What makes this Easy Homemade Ice Cream truly special is the addition of homemade truffle ganache. The silky chocolate swirls create pockets of intense flavor throughout every scoop, transforming a simple frozen dessert into an elegant treat worthy of special occasions.
Whether you’re preparing a dessert for a family gathering, a summer barbecue, a birthday celebration, or simply satisfying a craving for something sweet, this Easy Homemade Ice Cream is guaranteed to impress. Every spoonful delivers a perfect balance of creamy vanilla ice cream and rich chocolate truffle goodness.
Why This Easy Homemade Ice Cream Works
One reason this Easy Homemade Ice Cream stands out is its no-churn design. Traditional ice cream often requires specialized equipment and constant churning to prevent ice crystal formation. This recipe bypasses that process while still achieving an incredibly smooth texture.
The sweetened condensed milk serves as both a sweetener and texture enhancer. Because it contains less water than regular milk, it helps reduce ice crystal formation during freezing.
Heavy cream contributes richness and creates the luxurious mouthfeel expected from premium ice cream. Combined with powdered milk, it produces a dense, creamy consistency that feels remarkably similar to artisan ice cream.
Another reason this Easy Homemade Ice Cream succeeds is the marbled ganache swirl. Instead of mixing the chocolate throughout the base, it remains in ribbons, creating bursts of intense flavor with every bite.
Finally, the simple freezing process makes this Easy Homemade Ice Cream virtually foolproof. Even first-time ice cream makers can achieve excellent results.
What You’ll Need For This Easy Homemade Ice Cream
Ingredients for the Ice Cream Base
- 2 cans sweetened condensed milk (approximately 800 g / 28 oz)
- 2 cartons heavy cream (400 g / 14 oz)
- 1 cup powdered milk (100 g / 3.5 oz)
- 1 tablespoon vanilla extract
Ingredients for the Truffle Ganache
- 200 g semi-sweet or milk chocolate
- ½ carton heavy cream (100 g / 3.5 oz)
Equipment Needed
- Blender
- Mixing bowl
- Microwave or double boiler
- Spatula
- Knife or spoon for swirling
- Freezer-safe container with lid
- Ice cream scoop
Having everything prepared before you begin makes the process of creating this Easy Homemade Ice Cream even more enjoyable.
Time Required
One of the best aspects of this Easy Homemade Ice Cream is how little active work it requires.
Preparation Time
10 minutes
Ganache Preparation Time
10 minutes
Initial Freezing Time
2 hours
Final Freezing Time
4 hours
Total Time
Approximately 6 hours 20 minutes
Yield
About 2 liters of ice cream
Servings
10–12 servings
How To Make This Easy Homemade Ice Cream
Step 1: Prepare the Ice Cream Base
Add the sweetened condensed milk, heavy cream, powdered milk, and vanilla extract to a blender.
Blend until completely smooth and creamy. The mixture should be thick, silky, and free from lumps.
This rich mixture forms the foundation of your Easy Homemade Ice Cream.
Step 2: Begin Freezing
Transfer the blended mixture into a freezer-safe container.
Cover securely and place in the freezer for approximately two hours.
At this stage, the mixture will begin to thicken but will not be fully frozen.
Step 3: Make the Truffle Ganache
While the base chills, prepare the chocolate ganache.
Place the chocolate in a heat-safe bowl and melt gently using a microwave or double boiler.
If using a microwave, heat in 30-second intervals, stirring thoroughly after each interval.
Once fully melted, add the heavy cream and stir until glossy and smooth.
Allow the ganache to cool slightly.
Step 4: Remove the Base from the Freezer
After two hours, remove the partially frozen ice cream.
Use a spoon or spatula to stir thoroughly.
Breaking up early ice crystals is essential for achieving the smooth texture that makes this Easy Homemade Ice Cream so luxurious.
Step 5: Create the Chocolate Swirl
Drizzle spoonfuls of the cooled ganache across the surface.
Using a knife or spatula, gently fold the ganache into the mixture.
Avoid overmixing.
The goal is to create beautiful marbled ribbons throughout the Easy Homemade Ice Cream.
Step 6: Final Freeze
Cover the container securely.
Return it to the freezer for at least four additional hours.
Allow the dessert to freeze completely before serving.
Step 7: Serve and Enjoy
Remove from the freezer 5 to 10 minutes before serving.
Scoop into bowls or cones and enjoy every creamy bite of your homemade masterpiece.
Tips + Tricks & More For Easy Homemade Ice Cream Success
Use Very Cold Cream
Cold cream blends better and contributes to a smoother final texture.
Don’t Overblend
Blend only until smooth. Excessive blending can affect the consistency of the cream.
Cool the Ganache Properly
The ganache should be thick but still pourable.
If it’s too warm, it will sink.
If it’s too cold, it won’t swirl properly.
Stir During Freezing
The first stirring stage is extremely important.
Breaking up ice crystals ensures your Easy Homemade Ice Cream remains creamy.
Use a Shallow Container
Shallow containers promote even freezing and improve texture.
Seal Properly
Air exposure causes freezer burn and unwanted ice crystals.
Variations of Easy Homemade Ice Cream
One of the greatest advantages of this Easy Homemade Ice Cream is its versatility.
Nut Lovers Version
Fold in:
- Chopped pecans
- Toasted almonds
- Hazelnuts
- Walnuts
Cookie Version
Add:
- Crushed chocolate cookies
- Sandwich cookies
- Biscotti pieces
Fruit Swirl Version
Replace part of the ganache with:
- Raspberry sauce
- Strawberry compote
- Blueberry preserves
Salted Caramel Version
Create a swirl using homemade caramel sauce.
Coffee Version
Add espresso powder to the ganache for a mocha-inspired dessert.
White Chocolate Version
Use white chocolate instead of milk or semi-sweet chocolate.
How To Serve Easy Homemade Ice Cream
Presentation can elevate this dessert from delicious to unforgettable.
Serve the Easy Homemade Ice Cream in:
- Ice cream bowls
- Waffle cones
- Sugar cones
- Dessert glasses
- Mason jars
The dramatic chocolate swirls look especially beautiful when displayed in clear serving dishes.
Serving Suggestions
This Easy Homemade Ice Cream pairs beautifully with numerous desserts.
Brownies
Warm brownies and cold ice cream create an irresistible contrast.
Chocolate Cake
A scoop alongside chocolate cake doubles the indulgence.
Fresh Fruit
Strawberries, raspberries, and bananas add freshness.
Waffles
Top freshly made waffles with a generous scoop.
Cookies
Serve between two cookies for an easy ice cream sandwich.
Hot Fudge
Drizzle warm chocolate sauce over the top.
Storage Instructions
Proper storage ensures your Easy Homemade Ice Cream stays creamy and delicious.
Use Airtight Containers
Always store in a sealed freezer-safe container.
Cover the Surface
Press parchment paper directly onto the ice cream surface before sealing.
Freeze Immediately
Return leftovers to the freezer as quickly as possible.
Avoid Temperature Fluctuations
Repeated thawing and refreezing can damage texture.
Best Enjoyed Within
For optimal flavor and texture, enjoy within 2–3 weeks.
Common Mistakes To Avoid
Using Warm Ingredients
Warm ingredients can affect texture and freezing quality.
Skipping the Mid-Freeze Stir
This important step reduces ice crystals.
Overmixing the Ganache
Too much stirring eliminates the beautiful marbled effect.
Freezing in a Deep Container
Deep containers freeze unevenly.
Leaving It Uncovered
Exposure to air causes freezer burn.
Avoiding these mistakes helps guarantee perfect Easy Homemade Ice Cream every time.
Frequently Asked Questions
Can I make this without powdered milk?
Yes, although powdered milk contributes extra creaminess and body.
Can I use dark chocolate?
Absolutely. Dark chocolate creates a richer, more intense ganache swirl.
Can I use flavored extracts?
Yes. Almond, coconut, maple, and mint extracts work beautifully.
How long does it last?
Up to three weeks for best quality.
Can I add mix-ins?
Definitely. Nuts, cookies, candies, and fruit sauces all work well.
Do I need an ice cream machine?
No. That’s what makes this Easy Homemade Ice Cream recipe so convenient.
Final Thoughts on Easy Homemade Ice Cream
This Easy Homemade Ice Cream proves that extraordinary desserts don’t require complicated techniques or expensive equipment. With a handful of simple ingredients and a straightforward process, you can create a frozen treat that rivals premium ice cream shop offerings.
The combination of creamy vanilla ice cream and luxurious chocolate truffle ganache creates a dessert that feels elegant yet comforting. Every scoop showcases beautiful swirls, rich flavor, and a velvety texture that keeps everyone coming back for more.
Whether served at family gatherings, holidays, celebrations, or quiet evenings at home, this Easy Homemade Ice Cream delivers consistent results and unforgettable flavor. Once you’ve tasted the creamy texture and decadent chocolate ribbons, you’ll understand why this recipe quickly becomes a favorite.
Gather your ingredients, clear some freezer space, and prepare to enjoy one of the most delicious homemade frozen desserts you’ll ever make.