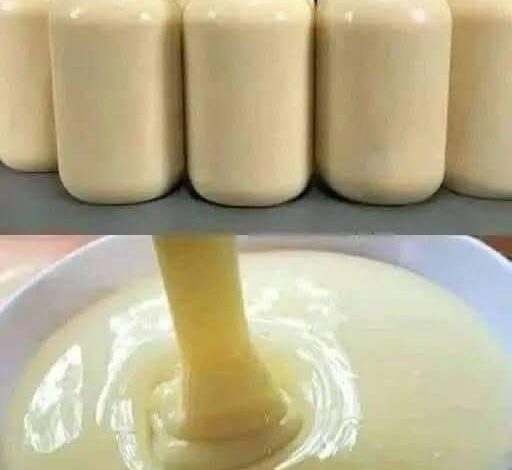
Sugar-Free Condensed Milk Recipe (Just 3 Ingredients!)
If you’ve ever wanted to make homemade condensed milk but without all the sugar, you’re in the right place! This sugar-free condensed milk recipe is creamy, delicious, and incredibly simple to prepare with just 3 ingredients. It’s a healthier alternative to the classic store-bought sweetened condensed milk, and it works beautifully in coffee, baking, and desserts. Best of all, it’s economical and takes only a few minutes to whip up.
Whether you follow a low-carb lifestyle, keto diet, or simply want to cut back on sugar, this recipe will quickly become a kitchen staple. Let’s dive in!
Why Make Sugar-Free Condensed Milk at Home?
Traditional condensed milk is made by simmering milk with sugar until it thickens, but it’s very high in carbs and calories. This sugar-free version replaces the sugar with a natural or low-carb sweetener, making it guilt-free while keeping the same rich texture and taste.
Homemade condensed milk has several advantages:
- ✅ Sugar-Free & Keto-Friendly – Perfect for those watching carbs or sugar intake.
- ✅ Economical – Uses pantry staples like milk powder, water, and sweetener.
- ✅ Quick & Easy – No hours of simmering; this version comes together in minutes.
- ✅ Versatile – Works in any recipe calling for condensed milk.
Ingredients You’ll Need
To make this easy recipe, you only need 3 simple ingredients:
- 2 cups milk powder – Use full-fat milk powder for the creamiest results.
- 1 cup hot water – This helps dissolve the milk powder and creates a smooth texture.
- ½ cup sugar-free sweetener – Options include erythritol, monk fruit sweetener, or stevia. Choose your favorite depending on taste preference.
Step-by-Step Instructions
- Blend the Milk Powder and Water
In a blender, combine the milk powder and hot water. Blend until smooth and creamy. - Add the Sweetener
Add your sugar-free sweetener of choice and blend again until fully dissolved and smooth. - Cool and Store
Pour the mixture into a glass jar and let it cool to room temperature. It will thicken as it cools. - Refrigerate
Store in the refrigerator for up to 1 week. Stir before using if separation occurs.
How to Use Sugar-Free Condensed Milk
This homemade condensed milk is incredibly versatile. Here are some delicious ways to use it:
- ☕ Coffee or Tea – Add a spoonful for a creamy, sweet finish.
- 🍮 Desserts – Perfect for making sugar-free fudge, pies, or cheesecakes.
- 🍓 Fruit Topping – Drizzle over strawberries, bananas, or other fresh fruit.
- 🍨 Ice Cream – Use it as a base for no-churn, sugar-free ice cream.
- 🥞 Pancakes & Waffles – Pour over breakfast favorites instead of syrup.
Tips & Variations
- For extra creaminess, add 1 tablespoon of butter or coconut oil while blending.
- Adjust sweetness to taste by adding more or less sweetener.
- If you prefer a thicker texture, refrigerate overnight.
- For a dairy-free version, use coconut milk powder instead of regular milk powder.
Storage Instructions
- Fridge: Store in an airtight jar for up to 1 week.
- Freezer: You can freeze it in small portions for up to 3 months. Thaw overnight in the refrigerator and stir before using.
Final Thoughts
This sugar-free condensed milk recipe is a true game-changer for anyone looking to enjoy the sweetness of condensed milk without the sugar spike. With just 3 ingredients and a blender, you’ll have a creamy, versatile, and healthier alternative ready in minutes.
Try it in your favorite sugar-free desserts, coffee, or even homemade ice cream – you won’t believe how close it tastes to the real thing!